Saturday, May 10, 2014

Sanding - Double Check

Flooring Part 4: 

My hands are still vibrating as I write this... we've been sanding today... all day.  And by we, my sweet husband did most of the work.  Something about having kids playing in the hose with their clothes on and dumping out the dog food took up most of my time... but I did do some... and definitely did quality control (poor husband).

So we used the Dewalt Orbital Sander and it is awesome!  We used a 60 grit paper first to get rid of the print and paint and my major cutting problems and then went over it with a 120 grit to quickly smooth each board out. 

The sanding pretty much corrected any unevenness I had from the cutting.  We also angled the sander to get a slight beveled look on the edges. 


The writing on the boards said that this product (the plywood) was known to cause cancer in the state of California.  Um... kind of freaked me out. So yes, wear your safety protection. I rock this look don't you think? 


Flooring Cut - Check

Flooring Part 3:

I'm slowly, but surely getting somewhere.  I finally finished cutting all the boards for the flooring.  I chose to cut the 8 ft boards into 6 ft, 5 ft and 4 ft lengths.  This leaves me also with 2 ft and 3 ft for extras I might need.  

Cutting to length was a little more difficult than I thought it would be. We don't own a table saw and I thought I could buy the Dremel SawMax (which is super easy to use) to cut a perfectly straight line. Because the saw does not have a straight covering, I could not use a piece of wood to keep me straight. I had to follow my pencil mark....very slowly.  My husband thought they looked fine, but when I laid the boards out on the floor, I could see the uneven and wavy lines here and there. 


So.... because I was unhappy with the waves, we decided to sand first instead of lay and then sand. This way, I can sand the unevenness into perfectly (hopefully perfect) straight edges. 

On another note.... while I was arranging the flooring and staring at my kitchen... a crazy thought came into my head... why not just do the cupboards at the same time.... it won't take too much longer. Uh, ok, brain. Since at the time my reasoning made sense, I had my boys take off all the doors.  I guess that means I really do need to finish them now.  


Tuesday, May 6, 2014

And the Flooring Winner Is.....

FAUX WOOD PLANKS!!!
Flooring Part 2:

Yep, I made a decision.  Now my goal is to have it done by my daughter's birthday party on the 17th.  I have 11 days, so let's get started!

Today was shopping day.  All of the tutorials I read had pretty good prices on their total cost.  I'm not complaining on what I spent, but I didn't have much of anything on hand, nor did I have all the tools necessary. So here's what I did get:

Wood~ I think I might have over figured, but I have a lot of irregular cuts to do. What I did was measure the area to be floored. I then multiplied it to get my square footage. I had 375sqft.  I chose a 1/4 inch pine sheet at $19.97 a sheet.  It was a 4ft x 8ft so I figured I needed 11 boards to equal my square footage.  Since I had already over estimated, I didn't add in another board or two. Lowe's charged me .25 per cut.  I had 55 cuts and they charged me for 50. So the wood and cuts cost me: $232.17 


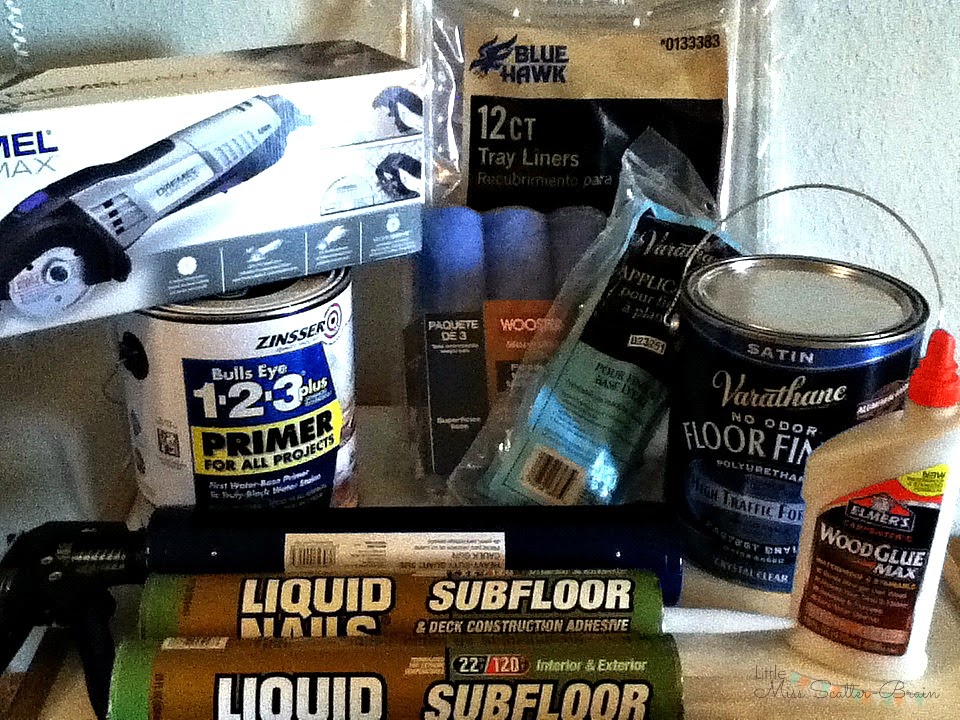
Supplies~ Good grief, I spent way more here than I thought I would.

              ~Paint Rollers (because washing them is way more work                     than I'm willing to do when painting) $9.98

              ~Tray Liners (again, convenience) $6.48

              ~5 GIGANTIC Liquid Nails Subfloor Adhesive $22.80

              ~GIGANTIC Caulk Gun for the gigantic adhesive $19.97                   YIKES!! Wasn't expecting that one.

              ~Varathane No Odor Floor Finish in Crystal Clear Satin                     $48.57 ( I hope I don't need more.)

       ~Primer $23.97

              ~Carpenters Wood Glue $6.78 
            (For a tip I picked up from a contractor.)

              ~Dremel SawMax $99.00 (Not absolutely needed, but,                         well, it looked awesome and the only saw I have is a                       circular one that is super scary.) 


So today I spent $516.95. I sure hope that's all I need, but with DIYing, you never know what's going to come up. Still better than other options we had. 

I'll keep you updated on the next steps as soon as I take them. 

Oh, and THANK YOU to the great employees at Lowe's. I was still uncertain of my decision, but as they helped me load up the wood, several employees were very excited for this project and even asked me to show them the finished product!  I'm excited now!

For More Flooring Posts:


For tutorials on flooring, check out my Dream Kitchen Pinterest Board below.


Friday, May 2, 2014

It's May!!! No More PROCRASTINATING!!!

Flooring Part 1:

Ok, so it's May.  That means it's time for me to get my rear in gear. 

March and April sure did bring in the showers in our home.  In one week, we had a leak in the roof, our water heater broke and the big one.... we discovered that our water filtration system had been leaking for some time and the whole flooring, including the subfloor, had to be replaced in the laundry room.  Our laundry room is connected to our kitchen, so me, being frugal, decided that we could diy our whole kitchen and laundry room for the price of flooring one room.  So... that brings us to May.  

My goal is to finish flooring in the laundry room and kitchen, paint cabinets, paint walls, and replace the kitchen counter tops. Oh, a new sink would be nice too.  The catch... I only have the money it would have taken to finish the laundry flooring.  I think my goal is obtainable, but I know things always come up. 

Here's how our beautiful pink kitchen looks now. Nice huh. I loved the 90's, but really? 


And my lovely vinyl flooring... really, it's not THAT bad.  And I will probably miss the fact that I don't ever have to mop.  Yep, it does hide the mess, but, I am ready to make this home ours.  I would love ceramic tile, but we're on a pier and beam, so that's not an option. 


So here's the plan:
Step One: 

Finally make a decision on what flooring I want.  Either...

painted subfloors like {Back to Domestics}

or faux wide planks from plywood like {Picklee}

Either way, I have major work ahead of me. Which one do you like best? 

Updated Flooring Posts:


Check out my Dream Kitchen Pinterest Board to see the rest of my kitchen inspiration!