Monday, May 25, 2015

Cheap and Easy Shower Decorations

I LOVE hosting baby and wedding showers, but don't always love the expense that can occur.  I finally came up with a way to have coordinating decorations with very little cost.  

All you need is:
~Coordinating paper
~Matching Paper Straws
~Twine
~Tissue Paper
~A Cutting Machine, or Trimmer and Punches

At most craft stores, on the scrapbook isle, they have the pads of coordinating themed paper.  Most every week, you can find these on sale.  During the Black Friday events, many of these are 50% -60% off.  That's when I stock up.   Normally they cost about $19.99 so $8-$10 is a super deal and well worth it.  Here's one I used recently to make baby shower decorations:


The paper colors and textures are just perfect!


 With many of these packs, the first few pages have bonus cutouts.  This is where you can get really creative with your decorating.  This particular pad had these cute rectangle sayings for a "Project Life" like scrapbook.  I used these instead as decorations:


Didn't they turn out sooooo cute.  I used paper straws to make the easels and used the leftovers for my jars. I used these instructions to make the paper straw easels.

Ok, so next, use the papers to create a banner.  You can personalize with letters if you wish, but for a quick and easy decor, just cut them out in the banner shape.  I used a Silhouette cutting machine, but simple triangles are easy to cut with a trimmer. 


With a hole punch and cheap twine...Ta Dah!  A banner!


While you have the Silhouette out, cut a bunch of circles.  If you have another circle punch or cutter, that will work too.  I then sewed a straight stitch through the paper circles.  Hot gluing them on twine will also work. 


Make a few paper balls like this tutorial and hang up!


You will have plenty of paper leftover so feel free to get as creative as you have time for.  It won't cost you any extra money!


Wednesday, June 25, 2014

Patriotic Breakfast

I'm always late when posting my holiday ideas, so I thought I'd share our new 4th of July tradition with you.  

I don't grill, it's too hot to cook indoors - in July - in Texas, and usually we are out running around to some fair, festival or a friends house celebrating, so I rarely get to use the amazing patriotic party ideas found across the internet.  

Last year I was dying to try out my new Silhouette Cutting Machine, so I threw a small patriotic themed breakfast for my family.  Anyone can pull this off with a few pieces of patriotic card stock, a little twine, and of course those fun paper straws. 


The Menu:
Blueberries and Strawberries
Blueberry Muffins
Milk 
Red Punch 

and of course a few little 4th of July trinkets. 

We ate breakfast outside on blankets and my family had a blast. I think I'll surprise them again. 


Monday, June 2, 2014

Rustic - Not Perfect

Flooring Part 5:

All I have left is the finishing touches (corner round and caulking) and then I can call the floor officially done! 


It has been one long month..... After cutting and sanding, we turned our attention to birthday mode.  We had to get our house put together for my daughter's party.... and we needed clean clothes -seriously.  So, in went the washer and dryer and away went the supplies. Well, they were neatly tucked in the dining room. 

The party, by the way, was super fun!  My daughter planned it herself.... a paint war!  And yes, thank goodness we put the flooring on hold. I was kinda freaking out over the cute little red footprints in the kitchen. 

Anyways, after the party, we got to work again. We decided to prime the sub-floors to prevent any mildew that could possibly happen (since it is in the kitchen). I then opted to start working on the cabinets as well.  I had a few helpers... 


Next came the laying. I'm going to be honest. The laying was a little harder than I had thought it would be. The boards weren't super straight and I was having a hard time getting over the fact that there were imperfections. Hence, my husband kept saying, "Rustic, NOT Perfect." 

We used the liquid nails for flooring on the back of each board and then nailed the boards in using a nail gun. 


A week ago we were finally ready to paint.... But, I ran into a snag- again.  As I was trying out a few different methods on the boards where the oven would be, I could not stand the nail holes.  They were rectangular do to the fact we used an all-in-one brad nailer and staple gun.  I thought once it was painted it wouldn't look bad.... nope, those holes were screaming at me.  


So, I filled all the holes (about 1,000) with saw dust mixed with wood glue. Then I had to plastic off the kitchen to sand. Sanding for 5 hours is not for the weak of heart.  I was pretty much dying when I was finished. 


After vacuuming and vacuuming AND vacuuming the floors, I decided upon a darker white wash on the boards. I used 5 parts paint to 1 part water.

Well, again... this is what happens when an amateur thinks they can do anything.... my paint strokes were VERY visible. Even with a very careful rolling system, I couldn't get an even look.  So, I did a second coat.  I did cover most of the grain, but I actually love the more solid colored look. 

After 3 more days, 4 loads of laundry at a friends house, and  6 coats of Varathane Floor Finish, I finally finished the floor... AND we can walk on it.  It's not as rustic as I had wanted and still not perfect, but I am super happy with the results.  


Was it worth a month of cooking on a skillet, having piles of dirty laundry in my room, staying up until midnight freaking out I've just wasted my money?... Yep!  I saved a little money, learned a LOT, and have a custom floor. Now, to finish the cabinets...

UPDATE: I completely forgot to mention my total.  I had quite a bit of wood and liquid nails left over and plan on using those for my chicken cook. I did have to buy another gallon of the finishing product.  So.....my total came to $1.30 per square foot.  Not too bad. 


Saturday, May 10, 2014

Sanding - Double Check

Flooring Part 4: 

My hands are still vibrating as I write this... we've been sanding today... all day.  And by we, my sweet husband did most of the work.  Something about having kids playing in the hose with their clothes on and dumping out the dog food took up most of my time... but I did do some... and definitely did quality control (poor husband).

So we used the Dewalt Orbital Sander and it is awesome!  We used a 60 grit paper first to get rid of the print and paint and my major cutting problems and then went over it with a 120 grit to quickly smooth each board out. 

The sanding pretty much corrected any unevenness I had from the cutting.  We also angled the sander to get a slight beveled look on the edges. 


The writing on the boards said that this product (the plywood) was known to cause cancer in the state of California.  Um... kind of freaked me out. So yes, wear your safety protection. I rock this look don't you think? 


Flooring Cut - Check

Flooring Part 3:

I'm slowly, but surely getting somewhere.  I finally finished cutting all the boards for the flooring.  I chose to cut the 8 ft boards into 6 ft, 5 ft and 4 ft lengths.  This leaves me also with 2 ft and 3 ft for extras I might need.  

Cutting to length was a little more difficult than I thought it would be. We don't own a table saw and I thought I could buy the Dremel SawMax (which is super easy to use) to cut a perfectly straight line. Because the saw does not have a straight covering, I could not use a piece of wood to keep me straight. I had to follow my pencil mark....very slowly.  My husband thought they looked fine, but when I laid the boards out on the floor, I could see the uneven and wavy lines here and there. 


So.... because I was unhappy with the waves, we decided to sand first instead of lay and then sand. This way, I can sand the unevenness into perfectly (hopefully perfect) straight edges. 

On another note.... while I was arranging the flooring and staring at my kitchen... a crazy thought came into my head... why not just do the cupboards at the same time.... it won't take too much longer. Uh, ok, brain. Since at the time my reasoning made sense, I had my boys take off all the doors.  I guess that means I really do need to finish them now.  


Tuesday, May 6, 2014

And the Flooring Winner Is.....

FAUX WOOD PLANKS!!!
Flooring Part 2:

Yep, I made a decision.  Now my goal is to have it done by my daughter's birthday party on the 17th.  I have 11 days, so let's get started!

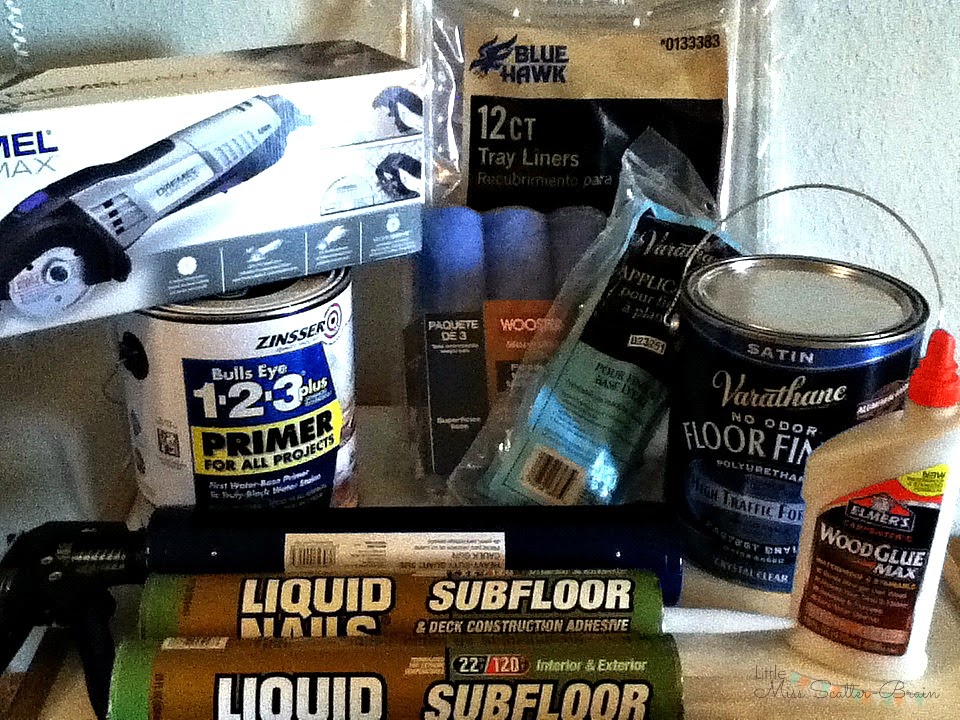
Today was shopping day.  All of the tutorials I read had pretty good prices on their total cost.  I'm not complaining on what I spent, but I didn't have much of anything on hand, nor did I have all the tools necessary. So here's what I did get:

Wood~ I think I might have over figured, but I have a lot of irregular cuts to do. What I did was measure the area to be floored. I then multiplied it to get my square footage. I had 375sqft.  I chose a 1/4 inch pine sheet at $19.97 a sheet.  It was a 4ft x 8ft so I figured I needed 11 boards to equal my square footage.  Since I had already over estimated, I didn't add in another board or two. Lowe's charged me .25 per cut.  I had 55 cuts and they charged me for 50. So the wood and cuts cost me: $232.17 


Supplies~ Good grief, I spent way more here than I thought I would.

              ~Paint Rollers (because washing them is way more work                     than I'm willing to do when painting) $9.98

              ~Tray Liners (again, convenience) $6.48

              ~5 GIGANTIC Liquid Nails Subfloor Adhesive $22.80

              ~GIGANTIC Caulk Gun for the gigantic adhesive $19.97                   YIKES!! Wasn't expecting that one.

              ~Varathane No Odor Floor Finish in Crystal Clear Satin                     $48.57 ( I hope I don't need more.)

       ~Primer $23.97

              ~Carpenters Wood Glue $6.78 
            (For a tip I picked up from a contractor.)

              ~Dremel SawMax $99.00 (Not absolutely needed, but,                         well, it looked awesome and the only saw I have is a                       circular one that is super scary.) 


So today I spent $516.95. I sure hope that's all I need, but with DIYing, you never know what's going to come up. Still better than other options we had. 

I'll keep you updated on the next steps as soon as I take them. 

Oh, and THANK YOU to the great employees at Lowe's. I was still uncertain of my decision, but as they helped me load up the wood, several employees were very excited for this project and even asked me to show them the finished product!  I'm excited now!

For More Flooring Posts:


For tutorials on flooring, check out my Dream Kitchen Pinterest Board below.


Friday, May 2, 2014

It's May!!! No More PROCRASTINATING!!!

Flooring Part 1:

Ok, so it's May.  That means it's time for me to get my rear in gear. 

March and April sure did bring in the showers in our home.  In one week, we had a leak in the roof, our water heater broke and the big one.... we discovered that our water filtration system had been leaking for some time and the whole flooring, including the subfloor, had to be replaced in the laundry room.  Our laundry room is connected to our kitchen, so me, being frugal, decided that we could diy our whole kitchen and laundry room for the price of flooring one room.  So... that brings us to May.  

My goal is to finish flooring in the laundry room and kitchen, paint cabinets, paint walls, and replace the kitchen counter tops. Oh, a new sink would be nice too.  The catch... I only have the money it would have taken to finish the laundry flooring.  I think my goal is obtainable, but I know things always come up. 

Here's how our beautiful pink kitchen looks now. Nice huh. I loved the 90's, but really? 


And my lovely vinyl flooring... really, it's not THAT bad.  And I will probably miss the fact that I don't ever have to mop.  Yep, it does hide the mess, but, I am ready to make this home ours.  I would love ceramic tile, but we're on a pier and beam, so that's not an option. 


So here's the plan:
Step One: 

Finally make a decision on what flooring I want.  Either...

painted subfloors like {Back to Domestics}

or faux wide planks from plywood like {Picklee}

Either way, I have major work ahead of me. Which one do you like best? 

Updated Flooring Posts:


Check out my Dream Kitchen Pinterest Board to see the rest of my kitchen inspiration!